Monday, July 15, 2013

Tutorial-Using Copics and Die Cuts

 I have a fun technique to share with you today on how to add depth to your cuts!  I’ve had many people ask for tutorials on how to use their Copic markers and I wanted to show you a couple of things you can do with them.  
I used one of my favorite cartridges, Animal Kingdom, to cut this cute lion.  He looks pretty good as is…..but a little flat.  
For the lion’s body I used these markers.  If you don’t have these exact colors that okay.  What I generally recommend is 3 colors.  A light, a medium, and dark in the same color family.  So my light color is E53, my medium color is E31, and my dark color is E33.  My Y26 I used as a contrasting color, but isn’t necessary.
Let’s start with our dark color first

When coloring an image I usually start with my darkest marker.  I create a sort of outline around the area I want to color.
Next comes my medium color, I am going to “drag” the darker color towards the center with a swiping motion. I also like to think about where shadows would be.  On this lion his belly would be darker as well as his legs. I went back over those areas with the darker marker a couple of times to create those shadows.
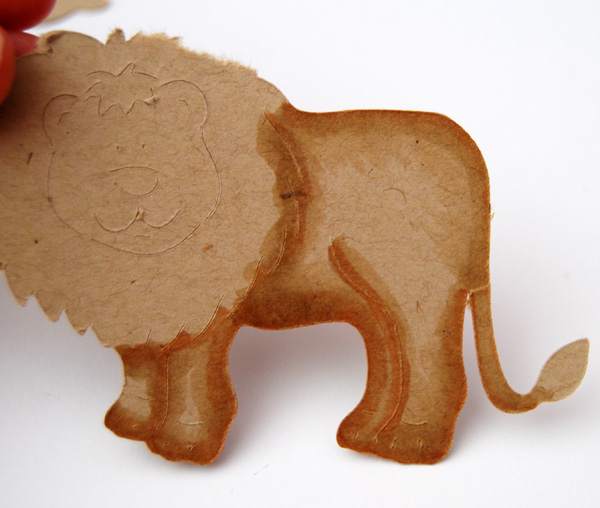
I then take my lightest marker and again, “drag” the two darker colors in towards the center with the same swiping motion.
The nice thing about Copic Markers is you can rework the areas over and over until  you get the desired effect. You are able to do this because they are alcohol based markers.
Now, I could have left the lion’s body alone, but I wanted to show you another fun technique to add texture.  You will need an old wash rag, Colorless blending solution, and a Copic Marker.
Simply squeeze a bit of the Colorless blender on the wash rag.
Then swipe the Copic marker where you placed the Colorless blender.  You have to work fairly quickly because it will dry pretty quickly.
Then dab your paper with the washrag.
It gives the lion’s body texture to almost resemble fur.  I’ve used this technique on grass, and just recently created a Halloween project with a tombstone and did this on grey paper to look a bit like stone.
I still need to finish the lion’s face, so I will use these markers……
I added a bit of pink to his ears and cheeks first, then went over it with my browns.  I also used the washrag technique so he matched his body. 
I am still not done because I have his mane to color.  Remember before? It was just a flat yellow piece of paper?
I am doing the same technique as before. I outlined the mane in my darkest color, Y19.
I took Y15 which is my medium color and dragged the darker color in towards the center with that same swiping motion.
I wanted the outside edges to be a bit darker so I went over it again with Y19.  I sometimes rework the image quite a few times before I am satisfied with it.
Again, I used Y15 to drag that darker color.
Remember my “flat” lion?
Well, here he is with his makeover!  : )
I added a little tag to his tail using the Sentimental’s cartridge.  : )
I hope I’ve given you a few tricks on how to use your Copic markers to add depth to your next project! If you have any questions please feel free to ask!
I will have another project later in the week using Copics and Die cuts.  

Have a great day my friends!!

Saturday, July 13, 2013

Last Day of JustRite's July Release!

Happy Saturday to you! It's a beautiful day in Chicago and we are going to hang out by the pool today. :) 
Today is JustRite's last day for their July release.  I hope you've enjoyed all the beautiful new Christmas sets!  I am not usually a CAS cardmaker, I usually like lots of "stuff" on my cards.  I admire people who create CAS cards, it's just not something I'm very good at.  
But for some reason, this card came together fairly simple for me.  (no pun intended!) 
I used Tim Holtz Distress markers to color the stocking from the new Christmas Gifts Vintage Labels Two, directly on the stamp.  I added a large striped ribbon, rusty jingle bells, and did a bit of paper piercing.  The sentiment was stamped in red and popped up using a bit of scoring to fold in the sides.  
Sometimes it's nice to go out of your comfort zone a bit and create something a bit different. :)
Be sure to stop by these ladies' blogs for more Christmas inspiration!


Have a beautiful Weekend!!!

Thursday, July 11, 2013

JustRite's July Release-Day 4!

So are you up for more Christmas projects?  Today is Day 4 of JustRite's July release.  The set I used is called, Christmas Vintage Labels Four. I also used Festive Poinsettias to dress up my ornament.  Apparently, I've been on an embossing kick, because this is another card that I used my Zing powders.  I used red, lime green, and pink. The background was cut with a Papertrey Ink die and I popped it up with dimensional foam circles to create a shadowbox appearance.  Loads of glitter was added to it for lots of sparkle. ;)
I layered my poinsettia and added some fuzzy red pom poms to the center. 

These creative ladies have some gorgeous projects to share with you, so be sure to pay them a visit!


I am off and running again today..... :)
Have a great day!

Wednesday, July 10, 2013

JustRite's July Release-Day 3!

Good morning! Today is Day 3 of the JustRite July release!  I am loving all this Christmas in July creating! Today's set is called, Vintage Christmas Ornaments. I decided to veer off from the traditional color scheme and mix it up a bit! The present shaped card was cut from my Silhouette.  I added lots of glitter to the bow for some holiday sparkle. 
I used the Vintage Christmas Ornament as a tag for my "box."  I embossed it with orange Zing powder. The leaves were embossed in lime green and very carefully cut out.  I added a bit of satin ribbon, a jewel, and a few random sequins. 

For more inspiration from our talented design team, be sure pay these girls a visit!


I am off to a day of shopping and lunch with my girlfriends! :)


Tuesday, July 9, 2013

JustRite's New Release-Day 2!

Good morning! 
Today is day 2 of JustRite's July release! 
For today's card I used two sets, Festive Poinsettia and Heritage Christmas. I did lots of embossing on my card.  For the ornament, I stamped it with Versamark and embossed it with baby blue Zing powder. The sentiment was done with silver. I wanted my poinsettia to have a soft airy look to it, so I stamped it on vellum.  It was embossed with a pale pink, and the leaves in green. I assembled my ornament and added a bit of silver string with a pearl to dress it up a bit.  I also added a bit of glitter tape and pearls as well.
The background stamp is actually from the fall, but it looked a bit like holly leaves to me....so I went with it! LOL! It was embossed in silver too.
Here are the two sets up close.  :)

To enable you just a bit.....there is a great sale going on over at JustRite.....20% off all Faber-Castell products!
Be sure to visit the other designers for more JustRite inspiration!


Margie Higuchi

Have a great day!!


Monday, July 8, 2013

JustRite's July Release-Day 1!

I hope you all had a lovely holiday weekend! I know I had a great time catching up with my family and relaxing a bit!

Today is day one of JustRite's July release! Two sets are being shown today, Festive Poinsettia and Grand Sentiments.  I will be showing Festive Poinsettia tomorrow.
Grand Sentiments is a great set that can be used as the focal point of the card, inside the card, or as a tag like I've done here. 
The sentiment was stamped in Versamark and sprinkled with red embossing powder.  It was cut out using a Spellbinder's tag. The edges were inked a bit with brown Memento ink. 
This cute Santa box was cut using my Silhouette.  It is perfect for filling with a gift card or sweet treats!
His beard and mustache were given a coating of liquid applique.  I love liquid applique! It gives his beard such great texture! I added a red pom pom for his nose, a bit of pink chalk to his cheeks, and black enamel accents for his eyes.   
Here is Grand Sentiments. :)
Be sure to visit these talented ladies' blogs for more inspiration!


One last thing! JustRite is giving away a $100 shopping spree in the JustRite Store to ONE lucky winner!  If you would like an opportunity to win this amazing giveaway, be sure to visit the JustRite Blog! 

Have a great day my crafty friends!