Friday, October 11, 2013

Lucy, Lucy, Lucy......

Okay admit it, you said it in your best Ricky Ricardo voice didn't ya?
I loved this show growing up! The situations Lucy and Ethel got themselves into cracked me up!
But then again I was easily amused. ;)
2 years ago, I decided to be Lucy for Halloween.  I had the "Lucy" wig and everything.
My students got a huge kick out of it!
I used my Cricut and the Suburbia cartridge to cut the retro lady and title. For my circular elements, I used Cricut Fonts and Basic Shapes. It was published in the February issue of Cricut Magazine. :)
See the old fashioned vacuum cleaner?  It's not just a cool prop for my picture it is the school's actual working vacuum cleaner......yep, still works.  (Maybe it's time to get a new one?) ;)
I used some vintage inspired papers to add to the retro feel of this page. 
I can not begin to tell you how happy I am it is Friday! I have a 3 day weekend to look forward to and Cortney has a modeling photo shoot on Sunday!
Life is good! I am blessed!
Have a great weekend my friends!


Wednesday, October 9, 2013

Sweet Taffy Apple!

Wow! Life has been busy lately!  I always thought as the kids got older I'd have more time......I was wrong!
They seem to always need a ride somewhere or have something going on.....
I remind myself that these days are fleeting and to just enjoy it.  
Crafting, blogging, whatever else can wait.
And this is the reason for my being away for a few days.

Every now and then I create just for the sake of creating. To rejuvinate my mojo.  Finding adorable cuts on Silhouette is one of the ways I do that! ;) 
Who can resist a delicious taffy apple in fall?
Accented with a couple of pretty sunflowers, rustic twine and glittery Prima leaves. I gave the "caramel" a sheen by adding glossy accents to it.  I even left "drip" marks along the right side using extra glossy accents. The sentiment is an SRM sticker and I thought it was perfect for a delicious taffy apple card. ;)
Speaking of sweet and perfect.....
Cortney in her Halloween costume.
She wanted to be a gypsy.
A pretty darn cute gypsy she is!
This is my favorite picture of her.  It is just so Cortney.  
Her coy little smile......melts my heart.
That's all for today my friends!  I am off to get an hour of crafting done while the hubby is golfing and the kids are doing their own thing this evening. 
Have a great night!


Monday, October 7, 2013

Crafty Secret's Design Team Challenge and Linky Party!

Today is Crafty Secret's Design Team Challenge and Linky Party!  Since it is October and fall has finally shown up to the party, the theme is to create Halloween/Fall  project. Easy enough! 
I adore Halloween and the crisp fall weather.  I love the leaves, the holidays approaching, the pumpkins, the comfort foods.....all of it.
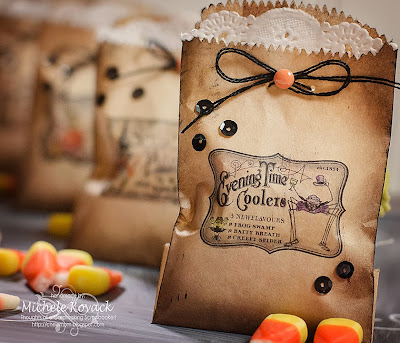
I created these little treat bags using Crafty Secrets Halloween Labels Digital stamps. 
I will show you an easy peasy way to run them through your printer.
I gave each sack a little color using my Copic Markers. A peek of a doily, a scattering of black sequins, and you have a pretty bag to put treats into.  
I have a folder in Adobe Photoshop for all of my Crafty Secret's digital stamps. I opened up the one I wanted and customized the size.  Since these bags are fairly small, I sized them to a 2.5 x 2.5 inches. I printed it first on regular computer paper. 
Then I used a low tack artist's tape to secure my bag.  I usually hold it up to my desk light just to make sure I've got it properly lined up.  (Believe me, a few found there way into the trash because they were a bit wonky!) 
Once it printed and I was happy with the alignment I took a pencil and marked the 3 edges of the bag.  That makes the next bag I print much much easier to line up! 
Those are my "cheaters" lines. :)
Print as many bags as you want.  I even switched up the image and my lines still worked!
Grab the colors you want and color away!
I love distressed edges, so I pulled out my Tim Holtz Distress ink out and used a sponge to give a bit of color to the edges. 
I followed that up with a bit of black ink. 
I always have a large stash of doilies, so I decided I wanted a bit to peek out from the top of the bag. I cut the part off I wanted and glued it into the inside portion of the bag. 
I use tacky glue a lot and didn't want the bag to stick together, so I put a piece of plastic packaging behind the doily until it was dry.  (It's sad that I can even find a use for plastic packaging... ;)
Fill 'er up with candy corn or whatever small candies you like and voila! 

Be sure to visit the other talented design team members. :)


 Elizabeth Lincoln

Have a great day my friends!