Today is Crafty Secret's Design Team Challenge and Linky Party! Since it is October and fall has finally shown up to the party, the theme is to create Halloween/Fall project. Easy enough!
I adore Halloween and the crisp fall weather. I love the leaves, the holidays approaching, the pumpkins, the comfort foods.....all of it.
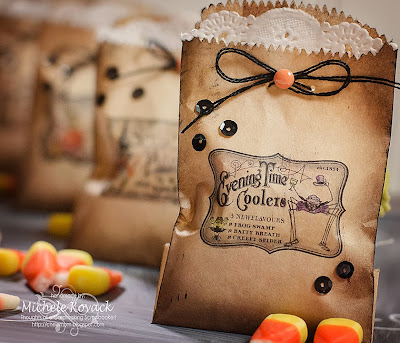
I created these little treat bags using Crafty Secrets Halloween Labels Digital stamps.
I will show you an easy peasy way to run them through your printer.
I gave each sack a little color using my Copic Markers. A peek of a doily, a scattering of black sequins, and you have a pretty bag to put treats into.
I have a folder in Adobe Photoshop for all of my Crafty Secret's digital stamps. I opened up the one I wanted and customized the size. Since these bags are fairly small, I sized them to a 2.5 x 2.5 inches. I printed it first on regular computer paper.
Then I used a low tack artist's tape to secure my bag. I usually hold it up to my desk light just to make sure I've got it properly lined up. (Believe me, a few found there way into the trash because they were a bit wonky!)
Once it printed and I was happy with the alignment I took a pencil and marked the 3 edges of the bag. That makes the next bag I print much much easier to line up!
Those are my "cheaters" lines. :)
Print as many bags as you want. I even switched up the image and my lines still worked!
Grab the colors you want and color away!
I love distressed edges, so I pulled out my Tim Holtz Distress ink out and used a sponge to give a bit of color to the edges.
I followed that up with a bit of black ink.
I always have a large stash of doilies, so I decided I wanted a bit to peek out from the top of the bag. I cut the part off I wanted and glued it into the inside portion of the bag.
I use tacky glue a lot and didn't want the bag to stick together, so I put a piece of plastic packaging behind the doily until it was dry. (It's sad that I can even find a use for plastic packaging... ;)
Fill 'er up with candy corn or whatever small candies you like and voila!
Be sure to visit the other talented design team members. :)


10 comments:
These are just so darling, Michele! Thanks for the great tip on marking the lines for multiple printings. You can bet I will be putting that to good use.
WOW! These are FABULOUS Michele and sure to bring a smile! Thanks for all the amazing details you've shared on making these cuties! Great idea and awesome job!
Great Tutorial Michele showing how you can custom print on bags and our Digital Halloween Label set goes perfect with the halloween charm you added.
Thanks for sharing
Sandy
Love your treat bags! I like the brown bags anyway, but they really go with Halloween. I did a post on reusing plastic packaging a while ago:
http://craftyjournal.com/ideas-for-re-using-plastic-packaging/
So cute, I love those little bags !
Wonderful bags! Thanks for the great tutorial. I am definitely going to try this.
Very,very Cute Michele!!
Too cute! How do you find the time? I could never find time to create when I was still teaching. Love these. Thanks so much.
Oh my gosh, what wonderful and adorable treat bags. Your Trick Or Treaters will love these pretties.
These are absolutely adorable! I love them! So creative, great job.
Post a Comment