Saturday, October 22, 2011

Blogiversary Blog Hop and Giveaway!

I got an e-mail last week from a gal named Heather to be a part of a blog hop to celebrate her Blogiversary. At first I was a bit reluctant to participate, but after visiting her blog and seeing what she does with the money she makes selling her cards, I had to say yes. In a time where all you seem to hear and see is sadness, violence, and people hurting one another, it was touching to see someone reaching out to others. I will share her story in just a minute.

So I created a card using my Cricut Expression and the A Child's Year Cartridge. I also used the Mother's Day Bouquet cartridge to create my flower. I added some glitter to her wand, and rhinestones to her wings.
I added flower stamens to the center of my flower and a bit of black twine behind it.


Heather had some connection through her church to a ministry called Sister Connection that works in Burundi Africa to bring hope and healing to the widows and orphans of the Civil War that happened in the 1990’s. One of the ways they do that is by building homes – at an incredible cost of only $600! They hire local builders, and purchase supplies locally as well, fostering a sense of ownership and pride within the community. In Burundian society, widows are viewed as outcasts, and have no one to advocate for them. The miracle of a new home is a testimony to the widow, her children, her community, and ultimately, to the country at-large. “Widows and orphans deserve healing, dignity, and hope!”

I would like for you to meet someone very special. Her name is Charlotte (Ndimurwanko Charlotte). She is the first recipient of a home through sales of Heather's cards. She has also committed to partnering with her as a sponsor for $30 a month to help provide her and her family with food, seed to plant, clothing, household necessities, medical care, and education assistance.
Charlotte has 3 married children, and she cares for 3 orphaned grandchildren. Her husband passed away in 1983. Her health is not good. This new home will help restore dignity and hope for Charlotte and her children. It is a true testimony of God’s love to the widow and orphan and a constant reminder that they are not forgotten.


To help Heather celebrate her Blogiversary, I am giving a bit of blog candy away! How about a full package of Teresa Collins Timeless paper, Teresa Collins trim, a Cuttlebug folder, a stamp, and a full distressing tool kit?!

What do you need to win this little prize package? Become a follower if you are not already and leave a comment telling me how you help people in your community or globally. On Sunday night at 9 P.M. EST, I will pick one winner randomly.


Be sure to visit these talented ladies' blogs!
Heather (Blog candy here too!: )

Amanda

Bonnie

Savannah

Michele - Me! : )

Have a wonderful weekend my friends!

Wednesday, October 19, 2011

Hello Thursday!

Today is Hello Thursday! The day Provo Craft releases their brand new Cricut cartridges! I had the pleasure of working with two of them for this month's release, Paper Trimmings the new exclusive Circle Cartridge, and Cricut Stencil.


This first card uses the Paper Trimmings Cartridge. It is full of lacy borders, circles, squares etc. To see the cuts be sure to visit the Cricut Blog for pictures! The acorns also came from this fun cartridge! I layered my cuts and did a bit of glittering and embossing to my pieces. I added a satin bow and a tag that was cut from the Sentimental's Cartridge.


My next two projects uses the Cricut Stencil Cartridge. Again, to see the cut page be sure to pop on over to the Cricut Blog! This cartridge has such fun images that are intended for stenciling, and an airbrush system. But it is fun to use the "postive" images as well! For the title I used the "negative" space and used Colorartz airbrush system in pink.

The crown and wand were created using the "positive" images and glittering them up!

Oh! and the little cutie pie is my little niece, Katie. She is definitely a little princess who is headed for diva-hood! ; )

My last card uses the wood grain cut and muslin fabric to create the background panel for my giraffe. The giraffe was cut using the Everyday Pop-up Cards Cartridge.

And because even giraffes should have a little glitter......... ; )

Be sure to stop on by the Cricut Blog to see all of the fabulous new cartridges that have come out! You are going to want them all!!!

Be sure to stop by tomorrow for a special blog hop and giveaway!

Happy Halloween!

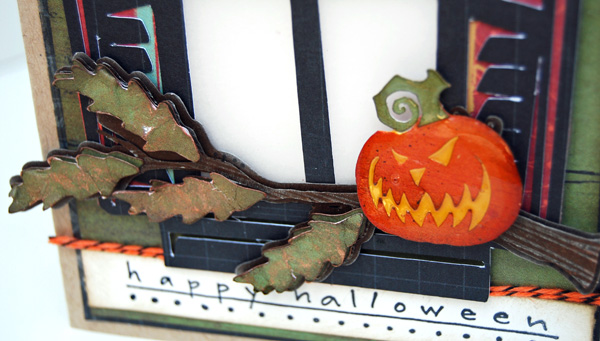
It is a rainy, windy, dreary day here in Chicago. Fall is definitely here, and you can feel that winter is right around the corner! And with it, is Halloween! I have a Halloween card to share with you today that I created for the Cricut Circle last year. It is a fun little card that uses the October 31st and Winter Woodland cartridges. The window was backed with a piece of vellum, so the the spider was just a soft shadow behind it. The branch was cut from Winter Woodland several times to give it extra dimension. I also embossed the branch with the Distressed Stripes folder and a bit of white acrylic paint. The leaves were rubbed in a gold ink after being crumpled and then flattened.
The papers are by Cosmo Cricket. The pumpkin was inked a bit with brown ink and glossy accents applied to the entire image. The sentiment is an old stamp of mine from Inkadinkadoo.


Off to get my rain gear on and head out the door this morning! ; ) Have a great day my friends!

Monday, October 17, 2011

Halloween in Disney

Good morning to you! I hope you had a great weekend! I spent the majority of it cleaning, doing laundry, and sorting clothes. I did manage to squeak in a bit of crafting here and there though. I have this habit of NOT scrapping in order.......just another part of me that is totally disorganized and chaotic! ; ) I usually scrap what I am in the mood for.....what inspires me at that moment. And since Halloween is creeping up I thought I'd pull some old photos of my kids from 5 years ago. It made me a bit nostalgic to see how little they look in these pictures. How 5 years has flown by.........

We spent our Halloween at Disney World, which we absolutely loved! The kids loved dressing up, trick or treating there, the parade, and seeing their favorite characters walking around. I used my Cricut Expression and the Happily Ever After cartridge to cut the castle at 11" I used all of the layer functions for the castle as well. The title was cut using the Mickey Font cartridge.
I love popping up smaller photos with dimensional foam circles for added depth and interest.

My castle was dressed up with rub ons, sequins, and pearls.

The title here was also popped up.....and a couple of pumpkin stickers were added. Oh! And did I mention glitter was added to the stream? ; )

I have a busy day ahead of me! Work, therapy with Cort, dinner, homework.......you know, the usual! Have a great day my friends!!!

Friday, October 14, 2011

Altered Wooden Spoon Tutorial!

Hi there! Happy Friday to you all! I have a tutorial on how I created my altered wooden spoon photo album! If you missed my first altered wooden spoon, click HERE to see it! Since it is October I thought I'd create a Halloween photo album to share some of my favorite photos!

Here is my Halloween Spoon...... : )


Step 1: I purchased several spoons at Wal-Mart. I took spray paint I had on hand and sprayed it a cream color. After the paint is dry, lightly sand the edges to distress it.

Step 2: I took my designer paper (My Mind's Eye) and Modge Podged it to the handle of the spoon. Again, when it is dry, lightly sand the edges to distress it.

Step 3: Cover the designer paper with glossy accents and sprinkle with glitter.

Step 4: Depending on the size of your spoon, the Spellbinder's ovals can vary. Just find the size that fits inside the spoon! I used the Petite scalloped oval as well. : )

Step 5: I printed my pictures at a 2 x 3 size, but again, this may vary depending on the size of your spoon.

Step 6: I took my oval die and placed it over my image. I took artist's tape, which is a low tack tape, and taped the die down, so it doesn't shift while I am die cutting.

Step 7: Here are all of my pictures die cut! : )

Step 8: Using my scalloped oval die, I die cut 9 pieces.

Step 9: Adhere the photos to the scalloped ovals.

Step 10: I took black seam binding and glued my pictures to the seam binding side by side. Be sure to leave "tails" at both ends of your album.

Step 11: My cover which is an image from the Crafty Secret's Halloween Journal Booklet, was glued to the backside of my first image.

Step 12: Since the spoon has some depth, I added dimensional foam circles, and added a bit of glue to make sure it was more secure.

Step 13: Since this spoon was particularly deep, I added circles......

Step 14: Add a bit more glue, so the album doesn't go anywhere!

Step 15: Place your last image on those dimensional foam circles.

Step 16: To keep my album closed and secure I use some velcro cut into small pieces.

Step 17: To fold your album, use an accordian fold. (Back and forth, back and forth). Between folds use a small piece of velcro on the top layer and bottom layer.


Step 18: Tie the seam binding into a bow to secure the album's closure. Then embellish the spoon and pretty it up! I used my Cricut Expression and the Happy Haunting's cartridge to cut the bat. I added black glitter to his wings. The sentiment is by Crafty Secrets and is part of the Costume Cuties' set.

I hope my directions were clear! If you have any questions please feel free to leave a comment here and I will answer any questions you might have!


Have a wonderful weekend my friends!

Wednesday, October 12, 2011

Halloween Altered Printer's Tray!

Good morning to you my friends! It is Wednesday already and almost half way through the work week! : ) I picked up a mini printer's tray at Hobby Lobby earlier this month and decided to decorate it for Halloween. I love these new papers by MME, Mischievous line! I love the softness to them and their vintage feel. I used my Cricut Expression and the Happy Hauntings cartridge to cut the pumpkins. I popped the second one up using a dimensional foam circle. I added a few leaves that I cut using the Mother's Day Bouquet cartridge, some buttons and twine. I added a bit of Spanish moss for my pumpkins to rest on!
These are my two goofy guys last year with their finished masterpieces!

......and my girl dressed as Hannah Montana! Is she rocking that wig or what?! ; )

I used a paper drinking straw to hang my lil' banner from. I bought a bunch of them and now am dreaming up ways to use 'em! The owl image is by Crafty Secrets. I enclosed it in a Melissa Frances frame and added crackle accents to it.

In my house, Halloween wouldn't be complete without taking some silly pictures of my dog in his costume. This year we opted for a squirrel! Doesn't he look absolutely thrilled?

......such a good sport my Skippers!

I am so glad you stopped by! I appreciate your visits!!!

Monday, October 10, 2011

Best of Cluck!

Good morning! I am so excited to have today off! This means I get to stay in my PJ's and craft allllllll day! Yahooooo! Cort has school, Kyle is off too, but unfortunately has been down for the count since yesterday. Poor kid is running a fever and has a sore throat. He fell asleep about 6 last night and is still sleeping. (12 hours and counting).

Today I have a country inspired rooster card to share with you! I used Crafty Secret's Farm Chicks set. I colored it with Prismas and Gamsol. I did a bit of hand stitching around the rooster with black thread to make him pop a bit more. I pulled out a little kraft envelope and stamped the wire fence image on it. I swiped it with a bit of white acrylic paint. I added some cute rooster paper I had in my stash and did some crazy machine sewing around the perimeter! ; )
I added a bit of lace, ribbon, twine, and a stick pin to finish it off!

Wishing you a very happy Monday!!