Showing posts with label Paper Sacks. Show all posts

Monday, October 7, 2013

Crafty Secret's Design Team Challenge and Linky Party!

Today is Crafty Secret's Design Team Challenge and Linky Party!  Since it is October and fall has finally shown up to the party, the theme is to create Halloween/Fall  project. Easy enough! 
I adore Halloween and the crisp fall weather.  I love the leaves, the holidays approaching, the pumpkins, the comfort foods.....all of it.
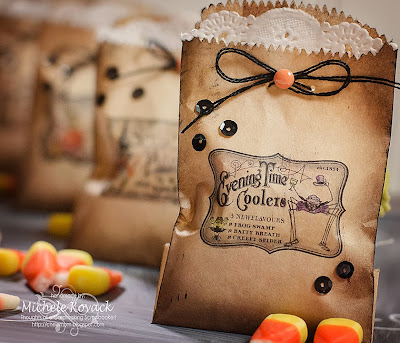
I created these little treat bags using Crafty Secrets Halloween Labels Digital stamps. 
I will show you an easy peasy way to run them through your printer.
I gave each sack a little color using my Copic Markers. A peek of a doily, a scattering of black sequins, and you have a pretty bag to put treats into.  
I have a folder in Adobe Photoshop for all of my Crafty Secret's digital stamps. I opened up the one I wanted and customized the size.  Since these bags are fairly small, I sized them to a 2.5 x 2.5 inches. I printed it first on regular computer paper. 
Then I used a low tack artist's tape to secure my bag.  I usually hold it up to my desk light just to make sure I've got it properly lined up.  (Believe me, a few found there way into the trash because they were a bit wonky!) 
Once it printed and I was happy with the alignment I took a pencil and marked the 3 edges of the bag.  That makes the next bag I print much much easier to line up! 
Those are my "cheaters" lines. :)
Print as many bags as you want.  I even switched up the image and my lines still worked!
Grab the colors you want and color away!
I love distressed edges, so I pulled out my Tim Holtz Distress ink out and used a sponge to give a bit of color to the edges. 
I followed that up with a bit of black ink. 
I always have a large stash of doilies, so I decided I wanted a bit to peek out from the top of the bag. I cut the part off I wanted and glued it into the inside portion of the bag. 
I use tacky glue a lot and didn't want the bag to stick together, so I put a piece of plastic packaging behind the doily until it was dry.  (It's sad that I can even find a use for plastic packaging... ;)
Fill 'er up with candy corn or whatever small candies you like and voila! 

Be sure to visit the other talented design team members. :)


 Elizabeth Lincoln

Have a great day my friends!


Wednesday, March 30, 2011

Another Brown Bag.....

Good morning! I am going back to work today after having 11 days off........I know, I know, no violins for me! LOL! Once I am back in the classroom, it will be like I never left. Maybe my students even missed me..... a little! ; ) I have another altered paper sack to show you. I actually converted this one into a card. Once again, I raided my stash for little pieces and embellishments, and this is what I came up with. The butterfly was cut using a Spellbinder's die, inked up, and given a generous amount of glitter. I had the crocheted flower from another project that didn't get used.
I added a Melissa Frances rub on to a metal rimmed tag. And gold glitter was added to the metal part. The paper is Papertrey Ink and Basic Grey. A few pearls were added as well as some stick pins for antennae.
A bit lumpy......just like I like it!
My girl is still home on spring break.....but today she is with a sitter. She misses school so much! She has been wanting to color pictures everyday for her teacher.......she will have quite a stash to give her come Monday! Wish I could have spent the whole week with her, but work calls........it is time I go back!

Have a great day!!! And thank you for stopping by!

Monday, February 21, 2011

Mini paper sack....

Good morning! It is an icky rainy morning here in Chicago.....but I have the day off, so it will be a perfect day to craft! Remember last week, when I said I was addicted to altering these cute little paper sacks? Well, I am......I think I need a 5 step program. (Along with my glittering problem! LOL!) I love that this "canvas" is so small and I can finish a project within a half an hour. Plus, It is a great way to use up those small scraps you can't bare to part with! This one was made for my girl......for Valentine's Day. I wrote my love letter to her on the tag, and slipped it in the bag. I used bits and pieces from Jenni Bowlin. Sassafrass, and a left over pink flower cut from my Cricut.
The chipboard star was sprayed with silver Shimmerz spray, then glossy accents was applied, and clear Martha Stewart glitter was sprinkled on top. I love the contrast of the dark gray here!
I am loving the dimension these little bags have after I am done! Lumpy.....bumpy....just like I like 'em! ; )
I am so glad you popped on by today! Thank you for taking a little peek!
Have a wonderful Monday!!!!

Tuesday, February 15, 2011

A Little Paper Sack!

Good morning to you! Cort is feeling much better, not 100% but better. Her appetite is slowly increasing and she is keeping the food down.......and drinking, which is good! I am attempting to send her back to school today and myself back to work. I hope it isn't too soon!

I bought a package of mini paper sacks and have been having a ball decorating and altering them. I have a few more to show you in the days ahead, but here is my first one. I used lots of scraps that I had saved from various papers and bits. A little Theresa Collins, a little Jenni Bowlin, and a few spare pieces I had printed from my Imagine machine and the Yummy Cartridge. (The hearts ) I even had a spare leaf cut from the Mother's Day Bouquet cartridge. Waste not want not! Inside the little bag is a tag with a little letter I wrote to Kyle for Valentine's Day. I love that it is hidden inside the bag.
The center heart was glittered with some Doodlebug glitter. The brad and orange pom pom trim are by SU!
I love all of the dimension of these little creations! : )
Thank you so much for popping by for a visit! They are always so appreciated!